Project Details:
This project was a DOOSY! And easily one of the biggest/most complicated pieces I’ve put together to date. So let’s get into it!
I started by jointing, planing, and squaring A TON of raw lumber – getting the pieces down to roughly 6″ depths to fit the jointer, only to be glued up again in 3 plank panels for the top, bottom, and both side pieces of the cabinet. I also planed and jointed a center upright measuring 12″ in width.
Once the panels were all glued up, I used a circular saw and a square with a straight edge to cut every piece down to dimension:
Lg Panel 1 – 4.5′ x 16.5″
Lg Panel 2 – 4.5′ x 17″
Sm Panels – 2′ x 16.5″
With the frame pieces all there, it was time to work on the door panels. I went through the same prepping, gluing, and dimensioning process as the cabinet frame pieces. Then, cut one frame door 5″ from the edge to create room for the wooden lattice feature. You can get a full DIY on how to make wooden lattice, here!
To get the door back together, I kind of screwed up. I simply glued the framed lattice feature back between the two cut panel pieces. This isn’t a good joint and likely won’t hold up well under climate changes, given the end grain to long grain connection wasn’t given much wiggle room. If you’re going to tackle this project in the future, better wood workers than I would recommend using a tongue and groove or floating spline to give this joint a better fighting chance. But alas, after gluing this back together, I cut the now long side of the panel back to size.
After having the exact dimensions of the door panels now at hand, I routed out two track gouges into the top and bottom frame panels to make room for the doors to slide back and forth across the face of the cabinet. I made sure not to run the track all the way to the end, since I would be using a right angle dowel joint to connect the top and bottom, meaning a track gouge would cut into what would be the side of the cabinet once all joined together.
I gave all of the interior edges of the frame a finishing level sand down before joining them together with dowel joints. In hindsight (and you’re going to repeat this project) I would have used more dowels for each panel joint. I used a home made jig to make sure all of the joints were lined up perfectly – this was just a scrap piece of wood that I drilled a few pilot holes in.
With the cabinet itself gluing, I got to work on the feet. I jointed, planed and squared lumber to generate 2.5″ x 2.5″ pieces. I cut the stretchers down to size, and used a simple taper jig to give the 6.5″ tall feet a little dimension before gluing them up with — you guessed it — dowel joints.
With the cabinet unit and the feet ready, I simple counter sunk 8 screws through the feet stretchers into the bottom of the cabinet to connect the two. Then I got to work on the upper shelving unit.
To make this, I did the same jointing and planing and squaring as before. To make the actual shelf panels, I glued two 6″ planks together for 3 different shelves. I then routed and slight gouge on the underside of each panel to make a sturdier (and squarer) connection point for the shelf panel and the 2″x 2″ cross beam that runs the length of each shelf between the two uprights.
The uprights, after being prepped were cut to 4.5′ at a 10 degree angle to create a slight lean. Before cutting the angles at each end, I made sure to measure, mark and cut the dowel mortises at the exact same place using my nice squared (at that time) ends to ensure level shelves.
After these were ready to go, I needed to come up with a way to hold the uprights in place while not creating undue stress on the two joint points between the shelves and the top face of the cabinet (as the wall is the third important support face for the structural integrity). Then I remembered that most manufactured China cabinets actually separate between the bottom cabinet and the upper shelves, and I had my solution! I created two dowel mortises at the bottom of each upright, sunk parallel to the floor, and two in the cabinet surface, then ONLY glued the dowel ends into the uprights. This keeps the shelf in place while still allowing for disassembly when moving the unit.
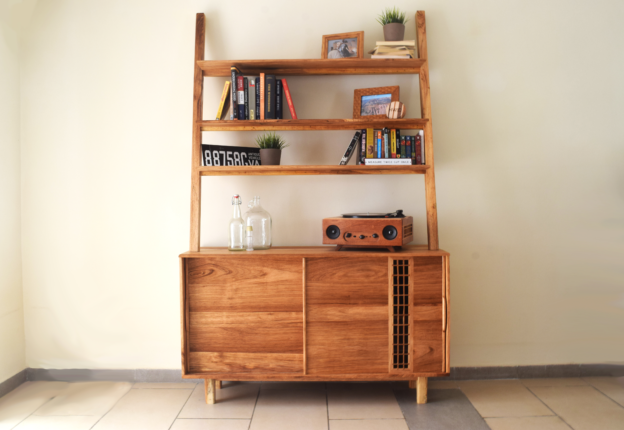
Anyway, the last thing to do to finalize the shelves was to put a slight, rounded over, mitered lip on the back side of each shelf panel, to give it a more finished look, and also keep the trinkets and books in place once finished!
To put the puzzle together, I glued the cross beams to the shelves first, then glued the cross beams into place in the uprights. And voila! The unit was structurally done! One last run with the sander, making my way up from coarser grits to finer grits, then a nice finish coat, and that’s a wrap!
Want full plans?
Work worth doing.